Final Review from MrLawler
Monday, December 14, 2015
Friday, December 11, 2015
Tuesday, December 8, 2015
Badges
DPI 1
<img src="https://docs.google.com/drawings/d/1Wrc_gL6yLp4YC4sfHyNW7fFhTNzQsuWh0jRunsejb4w/pub?w=72&h=72">DPI 2
<img src="https://docs.google.com/drawings/d/1TbTrIisgAqkAx7t1RfdkDcp5-mjaj4sn33gF4JXLlVU/pub?w=72&h=72">
DID
<img src="https://docs.google.com/drawings/d/13A2A-hkoO1RCqi_FrqLl65gkkZSBd0G-4GpEbEFOyXw/pub?w=72&h=72">COMM
<img src="https://docs.google.com/drawings/d/1_GxxhanejMIIWEQ_IY_xcGR5czibgNkb_WAuokWOkuQ/pub?w=72&h=72">Monday, November 30, 2015
DPI 2: Portrait Edits (older projects)
Blog Posts from older posts for portrait edits:
http://pchsdigitalart.blogspot.com/2015/10/dpi-2-emotional-effects.html
http://pchsdigitalart.blogspot.com/2015/10/dpi-2-tutorial-hdr-invert.html
Review document of past edits:
http://pchsdigitalart.blogspot.com/2015/10/review-of-photoshop-tools-and.html
Digital Illustration: Character Pitch Sheet
Using your "six heads" and "three bodies" designed last week, develop a "pitch sheet."

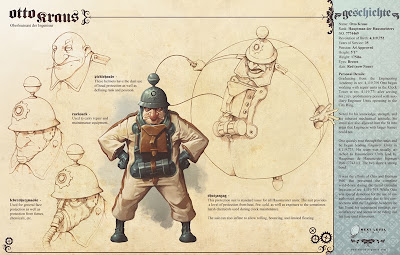


Character Information - Part I
Design a sheet using PhotoShop (see above). Make this eye-catching, organized, and professional. This should have just as much design as your artwork pitch.
Things to include:
- Boxes and layout to organize information
- Graphics or symbols to help the viewer understand quickly (ie. charts/tables)
- Profile information including name, species, gender, time period, brief biography, age etc.
- Attributes such as skills, experience, knowledge, expertise etc.
- Information about the personality
- Information about the background
- Information about the story and setting
Keep this information clear and concise. All of the information should fit on a single page, including graphics, and should be visually interesting.
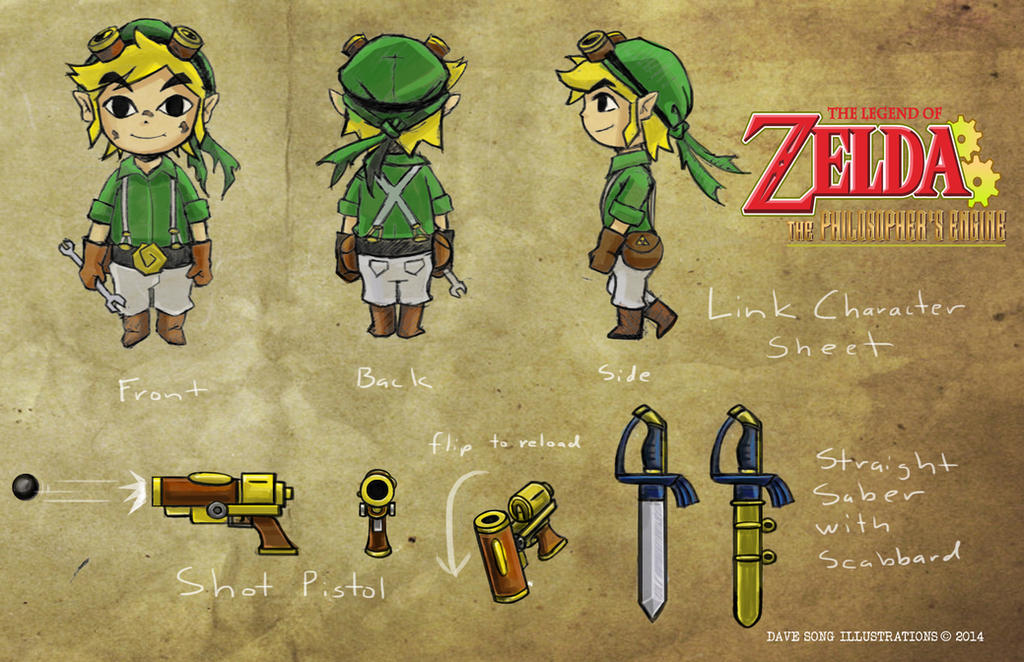
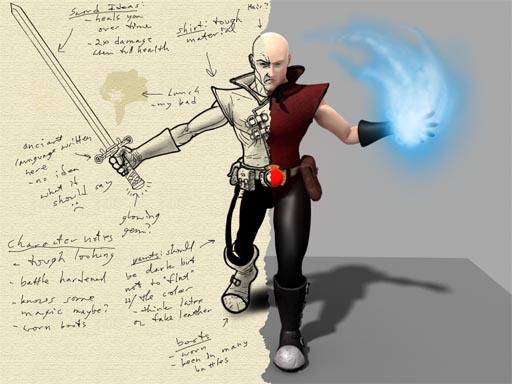
Character Design - Part II
Examples of Part 2
Requirements for Part 2:
- Include three bodies/views
- Include six heads/views
- Think about layout - make it eye-catching
- Include a LOGO for your series
- Include a LOGO for your character's name (do not use the same logo twice! but make them go together - create unity)
- Use color and texture to make it visually appealing
- None of the examples above are complete, but each shows components which are useful samples - mix and match to complete your own!
Tips
- K.I.S.S (Keep It Short and Simple)
- Get to the good stuff as fast as possible
- Use universal examples to quickly convey what your character is all about
- Be passionate and humble - tell us why your character is awesome, but keep this in perspective
Wk 16 Badges
DPI 1
<img src="https://docs.google.com/drawings/d/1k-S9_XkrrnX4I7qdpZXtxRdLHYcd-ZVS8wXJFUQLagQ/pub?w=72&h=72">DPI 2
<img src="https://docs.google.com/drawings/d/1mj_m6gcBOctUGTLVfS2vmNDwu2fk3JPQ1gs90UathRw/pub?w=72&h=72">DID
<img src="https://docs.google.com/drawings/d/18m7mR0agBbr9sX8B1OK6XEN7k9SIzMoNsH3wkBaAzqM/pub?w=72&h=72">COMM
<img src="https://docs.google.com/drawings/d/152XAA-ooRfRMOQle28MB7k_qsyBi32HBAYIzaMB_rE4/pub?w=72&h=72">Monday, November 23, 2015
DPI1 & 2 Review
DPI 2
Review of editing tools so far:https://docs.google.com/document/d/109cBBUV64Vmp4fEQTJFN8O1E9toRA5xLR4YRoLAwrXs/edit?usp=sharing
DPI 1
Review of editing tools so far:https://docs.google.com/document/d/14soPPf_80nKBmrzAmJDLwq-ttBdXgnbgHVSQxMlshkM/edit?usp=sharing
Badges for Wk 15
DPI 2 Badge
<img src="https://docs.google.com/drawings/d/1rW2NfcUWQwtpQjxO1_zNa7-DIRtxHmxAt0ICSytt8mM/pub?w=72&h=72">
DPI 1 Badge
<img src="https://docs.google.com/drawings/d/1KwkNv7e58crml6LtK1j0zrgV-KGO7icwlU1-sThPaLE/pub?w=72&h=72">
DID Badge
<img src="https://docs.google.com/drawings/d/1PYVIu54jYnsRz7t3n7UT6aczoEmL3PERDMaqFnj2xYI/pub?w=72&h=72">
COMM Badge
<img src="https://docs.google.com/drawings/d/1ptQgMSHdT2JAYS9ca3_2O6iiP4qVUyKHeEbMfF6sYlQ/pub?w=72&h=72">
Friday, November 20, 2015
DPI 1 - Photoshop Review and Basics
Use the following when applying filters/adjustments:
The Fade command can also modify the effects of using the Liquify command and Brush Strokes filters.
- Apply a filter, painting tool, or color adjustment to an image or selection.
- Choose Edit > Fade. ...
- Drag the slider to adjust the opacity, from 0% (transparent) to 100%.
- Choose a blending mode from the Mode menu. ...
- Click OK.
Choose FIVE tutorials from the list below:
- Gaussian Blur
- Add Noise
- Clouds
- Texturizer
- Lens Flare
- Sphereize
- Polar Coordinates
- Lighting Effects
- Offset
- High Pass
Save each as a separate file.
Wednesday, November 18, 2015
Monday, November 16, 2015
Digital Art Badges
DPI 1 Badge:
<img src="https://docs.google.com/drawings/d/1pByfs1fBXzPUkDuSfBg0zAYv55J0czC_gqqcyzf496A/pub?w=72&h=72">
DPI 2 Badge:
<img src="https://docs.google.com/drawings/d/1L4RC6fVozfndX5VPwEU4-G97zOB5c4KdgQZFJ-80NAk/pub?w=72&h=72">
DID Badge:
<img src="https://docs.google.com/drawings/d/1ss2Cu7CDVKyQUkvqZSFiURm9FRDCp8JvhZgP1vSTvdc/pub?w=72&h=72">
COMM Badge:
<img src="https://docs.google.com/drawings/d/1_BtOxonPNIIf3kt1y9yGwboJHgWwo6-J0U9-DrylfAs/pub?w=72&h=72">
Friday, November 13, 2015
Monday, November 9, 2015
Commercial Design Notes - Unit 4 Board Game Design
Boardgame Project
Commercial Design project based learning assignment: real world scenario. You have been given an opportunity to "pitch" your original boardgame to a group of investors. You will need to make a successful boardgame and attract an audience, earning the support of the investments (this is known as a prototype and elevator pitch).Elevator pitch: "a succinct and persuasive sales pitch"; imagine you were riding an elevator with a millionaire and you had until you both got off the elevator to impress the millionaire and get her to invest in your idea
Protoype: a first, typical or preliminary model of something that serves as a sample for a product
Objective
You will make a board game based on something you are interested in. You can base your game on sports, books, math, science, your favorite TV show or movie, etc. The possibilities are endless.You will need to make the questions, game board, cards, and playing pieces. You may work alone or you can work in a small group or partners.
Brainstorming Steps
- Decide on the genre: action, adventure, comedy, crime, horror, fantasy, science fiction, romance, or urban
- Decide on the format: board game (Monopoly, Sorry), strategy board game (Chess, Stratego), collectible card game (Pokemon, Magic the Gathering), wargame (Heroclix, BattleMasters), or role playing game (Dungeons & Dragons)
- Decide on the game mechanics: choose two different types of games, and study the mechanics. Blend these mechanics so that you can create a new game. For instance, could you combine Pokemon with Monopoly?
- Make your game original: Create unique art and characters for your game. DO NOT copy any previously created material. ORIGINAL art and designs are a must! If you want to make a game themed on Godzilla, you will need to create your own monster with its own backstory.
Creation Steps

Design: begin with simple plans - sketch out pieces and ideas

Determine: how the players will interact, and how will they win

Beta-test: practice the game mechanics with a friend before creating the final version
Create: begin creating the game pieces

Use Illustrator: create all of your pieces, boards and materials in Ullustrator
Digital Art Badge
New Digital Art Badge - Google Docs
<img src="https://docs.google.com/drawings/d/1d7hGCaVo1Yow_8kfhj09jFc2BH9YoPGdikbKI9lSPHs/pub?w=72&h=72">Friday, November 6, 2015
Digital Photography 1 - Movie Poster Requirements
Movie Poster Requirements
General Guidelines
- 16" x 20" poster size
- Choose ONLY Turkish Films - directed and created by Turkish artists (you may use Ayse in the Magical Land of Dwarves)
- Show at least one image of the main characters/actors in the film
- Include the Title of the Film
- Include the actor's names and character's names
- Optional (for more points): include the director's name
- Optional (for more points): include the film studio
- Optional (for more points): include awards and reviews/quotes
Specific Guidelines
- Create visual interest using compositional guidelines
- Include at least five images (you may use the internet)
- Use PhotoShop editing methods:
- Masking
- Color editing
- Using hand painting, sepia tone, effects
- Value/contrast editing
- Text editing
- Layer styles
- Converting an image to drawing/painting
- Graphic design
- Celebrate Turkish Culture!
Digital Photography 1 Movie Poster Project
Saving Your File
- Open your PSD file
- Goto FILE > SAVE FOR WEB (ignore all error messages)
- Change the IMAGE SIZE > 10% of the original size (ie. 4800 to 480)
- Then hit SAVE (save to a place you will be able to locate it)
Adding Your File to the Google Shared Doc
- Follow the link below
- https://docs.google.com/presentation/d/1G3m5Wc2jU-3K4k80mWeYAWq3l6ScsW3sMoO3RtczTOE/edit?usp=sharing
- Create a NEW SLIDE by clicking [+]
- Type in YOUR NAME (ie. Amanda Martinez)
- Click on INSERT IMAGE

- Find your file and INSERT

Thursday, November 5, 2015
Commercial Design Poster Project
Please add your tutorial and poster project to the following document:
https://docs.google.com/presentation/d/10gYFTTQ6k_hwU3V5ogBa9KIlgkRPsXLBiZT4aBDthyc/edit?usp=sharing
https://docs.google.com/presentation/d/10gYFTTQ6k_hwU3V5ogBa9KIlgkRPsXLBiZT4aBDthyc/edit?usp=sharing
Monday, November 2, 2015
Digital Art Badges - Wk 12
Digital Photography 1
<img src="https://docs.google.com/drawings/d/1qB8AbvktqTWw5kOXN0gddJ85CGa3vwFTrnyZHqHA_lY/pub?w=72&h=72">

Digital Photography 2
<img src="https://docs.google.com/drawings/d/1XONbUVNpjkIV7rmtFKC8AG8-YVOY3r-ouU1aDOF_CTY/pub?w=72&h=72">

Digital Illustration and Design
<img src="https://docs.google.com/drawings/d/1uPMQPoYdH7RzX2OdHazH0Bzasgx6eQOvYMS8u4xIxvw/pub?w=72&h=72">

Commercial Design
<img src="https://docs.google.com/drawings/d/1j0KFaP2L-85m32Fl6AfSKxWnTK1dytLxbdo2JYbYgmU/pub?w=72&h=72">

<img src="https://docs.google.com/drawings/d/1qB8AbvktqTWw5kOXN0gddJ85CGa3vwFTrnyZHqHA_lY/pub?w=72&h=72">
Digital Photography 2
<img src="https://docs.google.com/drawings/d/1XONbUVNpjkIV7rmtFKC8AG8-YVOY3r-ouU1aDOF_CTY/pub?w=72&h=72">
Digital Illustration and Design
<img src="https://docs.google.com/drawings/d/1uPMQPoYdH7RzX2OdHazH0Bzasgx6eQOvYMS8u4xIxvw/pub?w=72&h=72">
Commercial Design
<img src="https://docs.google.com/drawings/d/1j0KFaP2L-85m32Fl6AfSKxWnTK1dytLxbdo2JYbYgmU/pub?w=72&h=72">
Monday, October 26, 2015
Digital Art Badges
Digital Art Badge for Wk 11 - DPI 1, DPI 2, and DID
<img src="https://docs.google.com/drawings/d/14qT_kF29zoPHfrFWEtDmmjNLm80BLSlnutxUWBPczVE/pub?w=72&h=72">

Digital Art Badge for Wk 11 - COMM Design
<img src="https://docs.google.com/drawings/d/19u_5g2BhP20V4cEs1QO3kMJIQ3kbhHq0JA8JQiUa0Es/pub?w=72&h=72">

<img src="https://docs.google.com/drawings/d/14qT_kF29zoPHfrFWEtDmmjNLm80BLSlnutxUWBPczVE/pub?w=72&h=72">
Digital Art Badge for Wk 11 - COMM Design
<img src="https://docs.google.com/drawings/d/19u_5g2BhP20V4cEs1QO3kMJIQ3kbhHq0JA8JQiUa0Es/pub?w=72&h=72">
Thursday, October 22, 2015
DID: Tessellation Gallery 1
Add your tessellation to the gallery posted below:
https://docs.google.com/presentation/d/1vmL1DaX6au5GOZuQXkkqFZba6lzTp4pNbGoDpCa9prQ/edit?usp=sharing
https://docs.google.com/presentation/d/1vmL1DaX6au5GOZuQXkkqFZba6lzTp4pNbGoDpCa9prQ/edit?usp=sharing
Tuesday, October 20, 2015
DPI 2: Emotional Effects
Dramatic Lighting
Follow the steps below:https://docs.google.com/document/d/1Ek4CBnUUBTP6EnoXddjxdw1ZQXXz5f1RtM-S0_XqpdE/pub
If you cannot access the tutorial above, try the web address (where it originated):
http://www.photoshoptutorials.ws/photoshop-tutorials/photo-effects/create-powerful-emotional-effect-portraits-9-easy-steps/
Vintage Photo
Follow steps below:https://docs.google.com/document/d/1A-TOiM0EuSzkFcbp0xSbHjhqDdBgtUcydCszts9F1s8/pub
If you cannot access the tutorial above, try the web address (where it originated):
http://designinstruct.com/photography/vintage-photo-effect-photoshop/
Stylish Portrait Edits
Follow steps below:https://docs.google.com/document/d/1F7IDzoEswPpjM_1mXQf9ibKUgbgsSndD0d-0xC48Hr0/pub
If you cannot access the tutorial above, try the web address (where it originated):
http://www.designzzz.com/how-to-make-up-yourself-digital-retouching-photoshop/
Monday, October 19, 2015
Digital Art Badges Wk 11
Digital Photography 1
<img src="https://docs.google.com/drawings/d/1fCx8_SnKr92Hxbyyz211rFPhT_gG1izFwKmLmn0ApqU/pub?w=72&h=72">
Digital Photography 2
<img src="https://docs.google.com/drawings/d/1wptG9cCUjBcopxIeiMaBKi0hfT7I3S4OS-c9f6YriAE/pub?w=72&h=72">
Digital Illustration
<img src="https://docs.google.com/drawings/d/150SCrERf47KrkHN2tVcj1AEtX-V0_2Pwj_x4Bkq_5SU/pub?w=72&h=72">
Commercial Design
<img src="https://docs.google.com/drawings/d/1Lv393_UWt4HvblNC0c13EQ4Y-sjw6-1o4wJZm6PKZlU/pub?w=72&h=72">
Friday, October 16, 2015
Turkey Resources
Resources
- Byzantine Empire
- Ottoman Empire
- Modern Day Turkey
https://docs.google.com/document/d/1Pkvk4E9lJKcQjPXGHdoVhlar0r1JQZcPCn0pa0m5kII/pub
Turkish Culture
https://www.youtube.com/watch?v=KmLNn7cPTa0
Turkish Culture
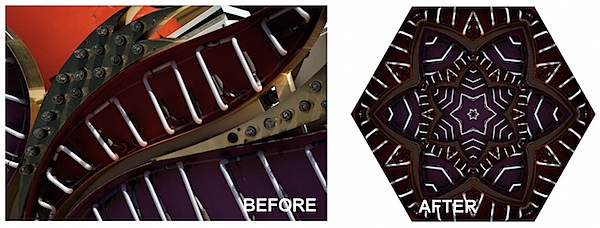
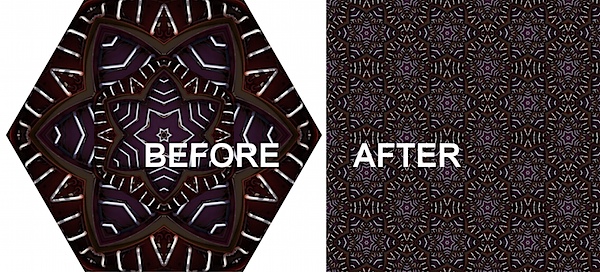
DID - Tessellation Tutorials
Turkish Inspired Lesson
Islamic patterns, or tessellations, influenced Christian Europe as a result of the trade in luxury goods along the routes that were established during the Middle Ages and the Renaissance. This trade resulted in an exchange of ideas and goods between the East and the West. In this unit, students will see the cross-cultural influences of patterns that were created on textiles, ceramics, glasswork, metalwork and paintings in China, Japan, the Middle East and Europe. They will note the continuing influence of this cross-cultural exchange in Renaissance art and in contemporary architecture, painting, prints, textiles, and product design. http://www.crbs.umd.edu/crossingborders/lessonplans/2005/berry.html
Lesson Objectives
- The teacher will demonstrate how to make shapes and how to design their own to create a tessellation using PhotoShop.
- Students will be referred to relevant websites for further instructions.
- Students will complete their own tessellations using their own shapes and colors to fill the spaces. \
- The Teacher will guide them through the creation.
Online Resources/Tutorials

http://creativepro.com/how-to-create-a-kaleidoscope-pattern-photoshop/

http://creativepro.com/how-to-create-kaleidoscopic-patterns-photoshop/

http://graphicdesign.stackexchange.com/questions/21808/how-do-i-create-this-tessellation-mondriaan-like-graphic

http://blog.spoongraphics.co.uk/tutorials/how-to-create-a-cool-abstract-radial-pattern-design
http://digital-photography-school.com/how-to-create-kaleidoscope-patterns-from-your-photos/
http://digital-photography-school.com/master-repeating-patterns-in-photoshop/

http://www.graphics.com/article-old/creating-step-repeat-effects-photoshop

http://www.photoshopforphotographers.com/CC_2013/Help_guide/tp/Gradient_tool.html
Thursday, October 15, 2015
Wednesday, October 14, 2015
Photo 1 and Photo 2: Tools Needed for This Project/Unit
Review of Photoshop Tools and Techniques for PHOTO 1
http://pchsdigitalart.blogspot.com/2015/10/photo-1-review-of-tools-and-techniques.html
Review of Photoshop Tools and Techniques for PHOTO 2
http://pchsdigitalart.blogspot.com/2015/10/review-of-photoshop-tools-and.html
Calendar and Due Dates
http://pchsdigitalart.blogspot.com/2015/10/blog-post.html
http://pchsdigitalart.blogspot.com/2015/10/photo-1-review-of-tools-and-techniques.html
Review of Photoshop Tools and Techniques for PHOTO 2
http://pchsdigitalart.blogspot.com/2015/10/review-of-photoshop-tools-and.html
Calendar and Due Dates
http://pchsdigitalart.blogspot.com/2015/10/blog-post.html
Tuesday, October 13, 2015
Digital Badges for Wk 9
Photo 1 Badge:
<img src="https://docs.google.com/drawings/d/1vTUvhpt6L8caPNm45bNaI70XoHWrte1WomDAAslUkx4/pub?w=72&h=72">
Photo 2 Badge:
<img src="https://docs.google.com/drawings/d/1aOBf6imZs7FjhZG55Qn0QJSlOJIo-CyG6AyPvSwfSEc/pub?w=72&h=72">
Commercial Design
<img src="https://docs.google.com/drawings/d/1wptG9cCUjBcopxIeiMaBKi0hfT7I3S4OS-c9f6YriAE/pub?w=72&h=72">
Digital Illustration
<img src="https://docs.google.com/drawings/d/1IB_2_-jGNeVz5xgW1_WzgTSqH2LM6sSqrNR53eKHRcA/pub?w=72&h=72">
Thursday, October 8, 2015
JJC Competition Entry Form
In order to enter, you must be able to attend the Awards Ceremony and Open House:
Thurs Nov 19, 7:30pm at the JJC Fine Arts Center.
Thurs Nov 19, 7:30pm at the JJC Fine Arts Center.
Wednesday, October 7, 2015
Tuesday, October 6, 2015
Tuesday Blog: Google Photos
 Google Photos
- Go to: https://photos.google.com/
- Create an ALBUM for "Unit 2 - Elements of Design"
- Once you are finished, SHARE
- Copy the SHARE link to your BLOGGER using HTML (like Badges and/or Slideshare)


Monday, October 5, 2015
Wk 8 Badges
Digital Photo 1
<img src="https://docs.google.com/drawings/d/1K8aSxl1T5V0hwKHZ_8t6NDrdTLilwNC2VmIEIe7y8r0/pub?w=72&h=72">
Digital Photo 2
<img src="https://docs.google.com/drawings/d/1Huj6M4Z4sPvel4QCW1CZGVaCHwa8hvmXdXnTBQVqPwM/pub?w=72&h=72">
Digital Illustration
<img src="https://docs.google.com/drawings/d/1napkydkiG632UQWpcz-wJUYBvJ2m2Ft2Y2Ht53wpeJY/pub?w=72&h=72">
Commercial Design
<img src="https://docs.google.com/drawings/d/1qB8AbvktqTWw5kOXN0gddJ85CGa3vwFTrnyZHqHA_lY/pub?w=72&h=72">
Friday, October 2, 2015
Thursday, October 1, 2015
DPI 2 Tutorial: HDR - Invert

Preliminary
1.
Edit a copy of an image using the B&W
adjustments
2.
Edit a copy of the same image using the Color
adjustments à
set layer blending mode to COLOR
3.
Create a GROUP and place all layers (including
Background à
Layer 0) in the folder
Shadow and Highlights
1.
Duplicate the GROUP
2.
Merge the Duplicate the GROUP and rename the
layer SHADOW & HIGHLIGHTS
3.
Use Adjustments à
Shadow & Highlights
4.
Change to layer blending mode MULTIPLY
Faux HDR
1.
Duplicate the SHADOW & HIGHLIGHTS layer and
rename INVERT
2.
Reset OPACITY back to 100%
3.
Tap CTRL+I (Adjustments à Invert)
4.
Change layer blending mode to OVERLAY
5.
FILTER à
GAUSSIAN BLUR to taste
Faux High Definition
1.
Duplicate INVERT layer
2.
Tap CTRL+I (Adjustments à Invert)
3.
Change layer blending mode to LINEAR LIGHT
4.
Adjust OPACITY to taste
Wednesday, September 30, 2015
Tuesday, September 29, 2015
Monday, September 28, 2015
DPI 1, DPI 2, DID, and COMM Badges
Copy the below HTML code for this week's badge:
<img src="https://docs.google.com/drawings/d/1cO3O7eLSmWzwEa55YtXvWPb1B9R7nndxDH_GNX2xZ4g/pub?w=72&h=72">

<img src="https://docs.google.com/drawings/d/1cO3O7eLSmWzwEa55YtXvWPb1B9R7nndxDH_GNX2xZ4g/pub?w=72&h=72">
Monday, September 21, 2015
DPI 1, DPI 2, DID and COMM Badges
Badges for all Digital Art
<img src="https://docs.google.com/drawings/d/1J4DVwUUk9T3I9GDGAhspwhP0XkLRZXoqshLU5dbmAM4/pub?w=72&h=72">.
Guided Practice is interactive instruction between teacher and students. After the teacher introduces new learning, he/she begins the student practice process by engaging students in a similar task to what they will complete later in the lesson independently.
Tuesday, September 15, 2015
Monday, September 14, 2015
Photo 1 Review
Review of Photoshop Tools and Techniques
Basic Editing
- crop to 8x10 or 10x8 > using the Rule of Thirds grid to avoid "Bull's-eye" compositions
- black and white (using Image > Adjustments)
- brightness/contrast (using Image > Adjustments)
- levels (using Image > Adjustments)
- curves (using Image > Adjustments)
- exposure (using Image > Adjustments)
- burn
- dodge
Adjustment Layers
- adjustment layers (for each Image > Adjustment)
- using masking (painting with black/white) to be selective
- choose only the most appropriate areas to apply adjustment
- NOTE: when using these, it is best to flatten the image afterwards (Image > Flatten Image)
Filters - duplicate Background layer each time!
- Correct for Clarity/Blurriness: Filter > Stylize > Emboss
- Correct for Clutter/ Create Differential Focus: Filter > Gaussian Blur; then erase areas to make them clear once more (also known as Depth of Field)
- NOTE: when using these, it is best to flatten the image afterwards (Image > Flatten Image)
Advanced Editing Tools
- Shadow/Highlight: to correct for flash or poor exposure (make sure to Show More Options)
Badges for Wk 5 - DPI 1, DPI 2, DID, COMM
DPI 1: Digital Photography 1
<img src="https://docs.google.com/drawings/d/1VXHpEbkDX1Hs8G1Y8GVgjN-1tQJhIs1LMn4waxMh7Io/pub?w=72&h=72">
DPI 2: Digital Photography 2
<img src="https://docs.google.com/drawings/d/1DGfhj9O6azTBZFgB5-FncSV4sRsqMKfbuR8tRlrdnOk/pub?w=72&h=72">
DID: Digital Illustration and Design
<img src="https://docs.google.com/drawings/d/1HrjWmC1LkrbPv5IjMga5bhSYJWXRKNAz8-PdszW_FeY/pub?w=72&h=72">
COMM: Commercial Design
<img src="https://docs.google.com/drawings/d/1_3leVOgrTLvQ2yIx1TBAECvZueCOYv1hatY19Jt9Fps/pub?w=72&h=72">
Thursday, September 10, 2015
Wednesday, September 9, 2015

Tuesday, September 8, 2015
Thursday, September 3, 2015
COMM Design Viewing Portfolios
http://www.tribecaflashpoint.edu/design-viscom-highlights
Review the Tribeca Student Portfolios


Review the Tribeca Student Portfolios
- Look at the process of development
- Look at the final versions
- Design using Illustrator as a 2D Graphic
- Create multiple color versions and decide on a 4-color color scheme
- Create 3D objects in Illustrator or take photos and use PhotoShop to put your logo on "products" (MAPPING)
Subscribe to:
Posts (Atom)