Digital Art Badge for Wk 11 - DPI 1, DPI 2, and DID
<img src="https://docs.google.com/drawings/d/14qT_kF29zoPHfrFWEtDmmjNLm80BLSlnutxUWBPczVE/pub?w=72&h=72">
Digital Art Badge for Wk 11 - COMM Design
<img src="https://docs.google.com/drawings/d/19u_5g2BhP20V4cEs1QO3kMJIQ3kbhHq0JA8JQiUa0Es/pub?w=72&h=72">
Monday, October 26, 2015
Thursday, October 22, 2015
DID: Tessellation Gallery 1
Add your tessellation to the gallery posted below:
https://docs.google.com/presentation/d/1vmL1DaX6au5GOZuQXkkqFZba6lzTp4pNbGoDpCa9prQ/edit?usp=sharing
Tuesday, October 20, 2015
DPI 2: Emotional Effects
Dramatic Lighting
Follow the steps below:https://docs.google.com/document/d/1Ek4CBnUUBTP6EnoXddjxdw1ZQXXz5f1RtM-S0_XqpdE/pub
If you cannot access the tutorial above, try the web address (where it originated):
http://www.photoshoptutorials.ws/photoshop-tutorials/photo-effects/create-powerful-emotional-effect-portraits-9-easy-steps/
Vintage Photo
Follow steps below:https://docs.google.com/document/d/1A-TOiM0EuSzkFcbp0xSbHjhqDdBgtUcydCszts9F1s8/pub
If you cannot access the tutorial above, try the web address (where it originated):
http://designinstruct.com/photography/vintage-photo-effect-photoshop/
Stylish Portrait Edits
Follow steps below:https://docs.google.com/document/d/1F7IDzoEswPpjM_1mXQf9ibKUgbgsSndD0d-0xC48Hr0/pub
If you cannot access the tutorial above, try the web address (where it originated):
http://www.designzzz.com/how-to-make-up-yourself-digital-retouching-photoshop/
Monday, October 19, 2015
Digital Art Badges Wk 11
Digital Photography 1
<img src="https://docs.google.com/drawings/d/1fCx8_SnKr92Hxbyyz211rFPhT_gG1izFwKmLmn0ApqU/pub?w=72&h=72">
Digital Photography 2
<img src="https://docs.google.com/drawings/d/1wptG9cCUjBcopxIeiMaBKi0hfT7I3S4OS-c9f6YriAE/pub?w=72&h=72">
Digital Illustration
<img src="https://docs.google.com/drawings/d/150SCrERf47KrkHN2tVcj1AEtX-V0_2Pwj_x4Bkq_5SU/pub?w=72&h=72">
Commercial Design
<img src="https://docs.google.com/drawings/d/1Lv393_UWt4HvblNC0c13EQ4Y-sjw6-1o4wJZm6PKZlU/pub?w=72&h=72">
Friday, October 16, 2015
Turkey Resources
Resources
- Byzantine Empire
- Ottoman Empire
- Modern Day Turkey
https://docs.google.com/document/d/1Pkvk4E9lJKcQjPXGHdoVhlar0r1JQZcPCn0pa0m5kII/pub
Turkish Culture
https://www.youtube.com/watch?v=KmLNn7cPTa0
Turkish Culture
DID - Tessellation Tutorials
Turkish Inspired Lesson
Islamic patterns, or tessellations, influenced Christian Europe as a result of the trade in luxury goods along the routes that were established during the Middle Ages and the Renaissance. This trade resulted in an exchange of ideas and goods between the East and the West. In this unit, students will see the cross-cultural influences of patterns that were created on textiles, ceramics, glasswork, metalwork and paintings in China, Japan, the Middle East and Europe. They will note the continuing influence of this cross-cultural exchange in Renaissance art and in contemporary architecture, painting, prints, textiles, and product design. http://www.crbs.umd.edu/crossingborders/lessonplans/2005/berry.html
Lesson Objectives
- The teacher will demonstrate how to make shapes and how to design their own to create a tessellation using PhotoShop.
- Students will be referred to relevant websites for further instructions.
- Students will complete their own tessellations using their own shapes and colors to fill the spaces. \
- The Teacher will guide them through the creation.
Online Resources/Tutorials
http://creativepro.com/how-to-create-a-kaleidoscope-pattern-photoshop/
http://creativepro.com/how-to-create-kaleidoscopic-patterns-photoshop/
http://graphicdesign.stackexchange.com/questions/21808/how-do-i-create-this-tessellation-mondriaan-like-graphic
http://blog.spoongraphics.co.uk/tutorials/how-to-create-a-cool-abstract-radial-pattern-design
http://digital-photography-school.com/how-to-create-kaleidoscope-patterns-from-your-photos/
http://digital-photography-school.com/master-repeating-patterns-in-photoshop/
http://www.graphics.com/article-old/creating-step-repeat-effects-photoshop
http://www.photoshopforphotographers.com/CC_2013/Help_guide/tp/Gradient_tool.html
Thursday, October 15, 2015
Wednesday, October 14, 2015
Photo 1 and Photo 2: Tools Needed for This Project/Unit
Review of Photoshop Tools and Techniques for PHOTO 1
http://pchsdigitalart.blogspot.com/2015/10/photo-1-review-of-tools-and-techniques.html
Review of Photoshop Tools and Techniques for PHOTO 2
http://pchsdigitalart.blogspot.com/2015/10/review-of-photoshop-tools-and.html
Calendar and Due Dates
http://pchsdigitalart.blogspot.com/2015/10/blog-post.html
http://pchsdigitalart.blogspot.com/2015/10/photo-1-review-of-tools-and-techniques.html
Review of Photoshop Tools and Techniques for PHOTO 2
http://pchsdigitalart.blogspot.com/2015/10/review-of-photoshop-tools-and.html
Calendar and Due Dates
http://pchsdigitalart.blogspot.com/2015/10/blog-post.html
Tuesday, October 13, 2015
Digital Badges for Wk 9
Photo 1 Badge:
<img src="https://docs.google.com/drawings/d/1vTUvhpt6L8caPNm45bNaI70XoHWrte1WomDAAslUkx4/pub?w=72&h=72">
Photo 2 Badge:
<img src="https://docs.google.com/drawings/d/1aOBf6imZs7FjhZG55Qn0QJSlOJIo-CyG6AyPvSwfSEc/pub?w=72&h=72">
Commercial Design
<img src="https://docs.google.com/drawings/d/1wptG9cCUjBcopxIeiMaBKi0hfT7I3S4OS-c9f6YriAE/pub?w=72&h=72">
Digital Illustration
<img src="https://docs.google.com/drawings/d/1IB_2_-jGNeVz5xgW1_WzgTSqH2LM6sSqrNR53eKHRcA/pub?w=72&h=72">
Thursday, October 8, 2015
JJC Competition Entry Form
In order to enter, you must be able to attend the Awards Ceremony and Open House:
Thurs Nov 19, 7:30pm at the JJC Fine Arts Center.
Wednesday, October 7, 2015
Tuesday, October 6, 2015
Tuesday Blog: Google Photos
Google Photos
- Go to: https://photos.google.com/
- Create an ALBUM for "Unit 2 - Elements of Design"
- Once you are finished, SHARE
- Copy the SHARE link to your BLOGGER using HTML (like Badges and/or Slideshare)
Monday, October 5, 2015
Wk 8 Badges
Digital Photo 1
<img src="https://docs.google.com/drawings/d/1K8aSxl1T5V0hwKHZ_8t6NDrdTLilwNC2VmIEIe7y8r0/pub?w=72&h=72">
Digital Photo 2
<img src="https://docs.google.com/drawings/d/1Huj6M4Z4sPvel4QCW1CZGVaCHwa8hvmXdXnTBQVqPwM/pub?w=72&h=72">
Digital Illustration
<img src="https://docs.google.com/drawings/d/1napkydkiG632UQWpcz-wJUYBvJ2m2Ft2Y2Ht53wpeJY/pub?w=72&h=72">
Commercial Design
<img src="https://docs.google.com/drawings/d/1qB8AbvktqTWw5kOXN0gddJ85CGa3vwFTrnyZHqHA_lY/pub?w=72&h=72">
Friday, October 2, 2015
Thursday, October 1, 2015
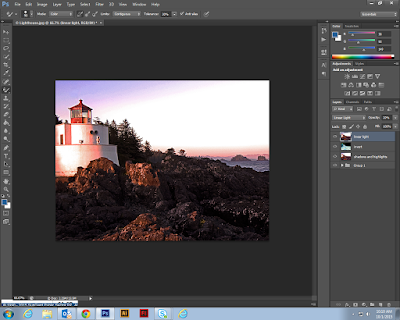
DPI 2 Tutorial: HDR - Invert
Preliminary
1.
Edit a copy of an image using the B&W
adjustments
2.
Edit a copy of the same image using the Color
adjustments à
set layer blending mode to COLOR
3.
Create a GROUP and place all layers (including
Background à
Layer 0) in the folder
Shadow and Highlights
1.
Duplicate the GROUP
2.
Merge the Duplicate the GROUP and rename the
layer SHADOW & HIGHLIGHTS
3.
Use Adjustments à
Shadow & Highlights
4.
Change to layer blending mode MULTIPLY
Faux HDR
1.
Duplicate the SHADOW & HIGHLIGHTS layer and
rename INVERT
2.
Reset OPACITY back to 100%
3.
Tap CTRL+I (Adjustments à Invert)
4.
Change layer blending mode to OVERLAY
5.
FILTER à
GAUSSIAN BLUR to taste
Faux High Definition
1.
Duplicate INVERT layer
2.
Tap CTRL+I (Adjustments à Invert)
3.
Change layer blending mode to LINEAR LIGHT
4.
Adjust OPACITY to taste
Subscribe to:
Posts (Atom)